Introduction
In this article i am going share with you how you can get started with the github and start building your projects/app. Also i want to share some of the useful resources and commands of Git and GitHub that i have learnt in my developer journey so far.
Definition
Before i start with how to get started with GitHub, I would like to let you know the difference between Git and GitHub which i am sure you are well aware of. But in case if you are not here we go.
Git
Git is free and open source distributed version control system designed to handle small to very large projects with ease.
GitHub
GitHub is a web-based Git or version control repository and Internet hosting service. It offers all of the distributed version control and source code management (SCM) functionality of Git as well as adding its own additional features such as hosting your application, Workflows(GitHub Actions), Wiki for documentation etc. Its been made free to developer community after it was acquired by microsoft in recent times and because of the fact that it is so cool and useful, some people now like to call it as "Github is the new instagram of Developers" :D.
I also would like to mention some of the articles here that helped me understand these concepts during my journey.
-
So to start off with i would like to first jump into how you can get started with GitHub and along the line i will also put down some of the useful git commands that we would use while working with github.
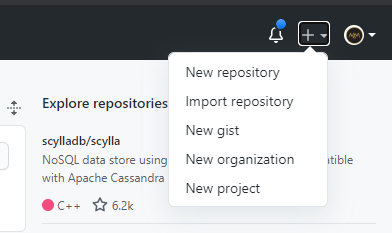
Before we go any further make yourself a GitHub account(if you do not have one) signing up on the front page. Once you are done setting up your account on github first thing you could do is to create repository.
- In the upper right-hand corner, click the + sign and click New Repository.
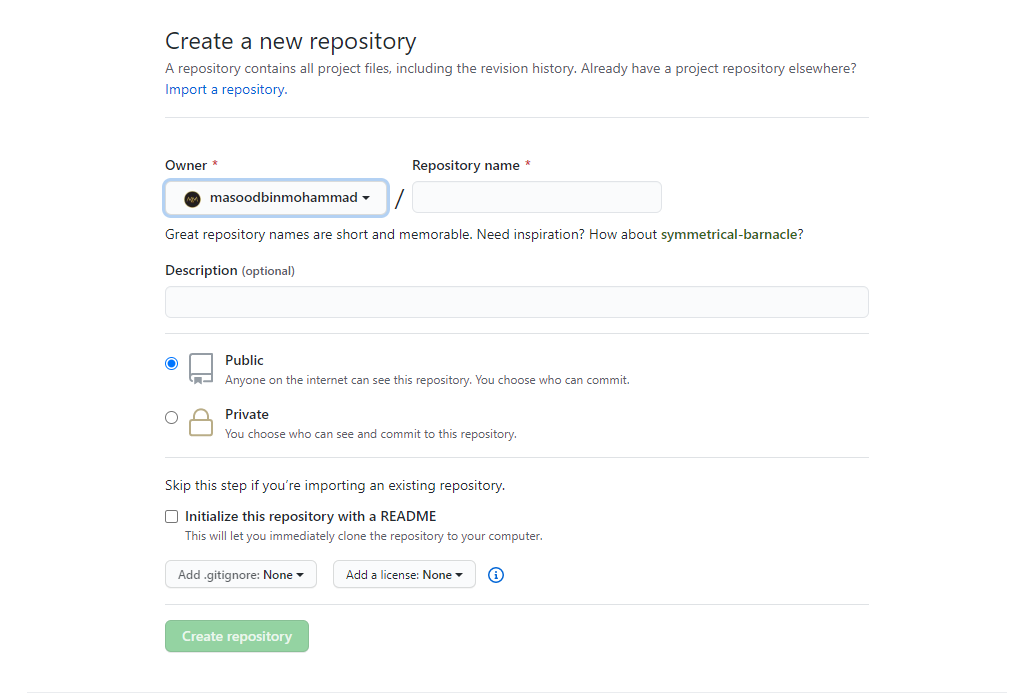
 - On the next page, give a name to your repository and a short description. If you want to keep your repo private choose private else be it public and you can also initialise your repo with readme.md which you can use it write basic documentation about your repo so that other people can understand more about your repo. Once you are done, click Create repository:
If this is your firstime, Congrats you have just created your very first remote repository.😉
Now its time to talk about Git. If you have not setup git yet in your local computer then this is the that thing you need to have it in the first place before we proceed with anything further. This following are the really good article if you are struggling to find one.
Then you need to set the username and email after installing the git. you can do that by using following command
    git config --global user.name masood mohammad
    git config --global user.email masoodbinmohammad@hotmail.com
Okay, So before i go ahead and share you the other git commands that , we need to know what git repoistory is for.
What is Git repostory(.git)
This is a folder inside your project where git tracks all the changes made in the files and build a history reference over time. In your project the git repository folder you will see a .git folder. Note: The git repository should be at the root of the project folder, for it to track changes to the whole project.
So if you want to make your current folder a git repo, all you need to do is execute this simple command on your command prompt inside the particular folder
git initthe other useful git commands are,
1. git status
Running git status will show you which files are currently in the staging area.
git statusIf the names of the files listed are in red that means they are not in the staging area. But if they are green, they are in the staging and are ready to commit.
2. git add
Running git add moves the file/files in the staging area. This helps you to review your changes before you commit. To add a single file
git add index.htmlTo add multiple files
git add .3. git rm
This helps to unstage any file in the staging area.
git rm --cached index.html4. git commit
Running this will commit your files in the staging area. You can also add a descriptive message to the commit to help you when reviewing your project folder in the future.
git commit -m "added index and styles file"5. git log / git log --oneline
git log helps you to see the commit history. Each commit has a unique id, the author details, date, time and the commit message.
git log/ git log --onelinegit log --oneline show the shorter version(log in one line). It includes the id and the commit message. ## get commits by a specific author
git log --author jane
## get commits by message
## get commit that contains 'index'
git log --all --grep index
## get commit in the last 2 weeks
git log --since=2.weeks6. git checkout commit
This helps you to go back to a previous commit. But any changes done will not be saved and the commit history won't be ruined. This is read only stage and this is why it's safer than revert or reset. If you want to create a new branch to retain commits you create, you can by using -c with the switch command.
    git switch -c <new-branch-name>
    ## undo this by:
    git switch -
7. git revert
It inverts the changes introduced by the commit and creates a new commit with the inverse code.This is safer than using git reset plus it doesn't delete the commit permanently.
8. git reset
This doesn't delete a commit but the commit will not have a direct path from a ref to access them. It alters the commit history. This commits can be found and restored using git reflog.
    git checkout 91471e4
    git revert 91471e4
    git reset 91471e4

    ## Any pending work that was hanging out in the
    Staging Index and Working Directory will be lost.
    git reset 91471e4 --hard

    ##The Staging Index is reset to the state of the specified
    commit.Any changes that have been undone from the Staging
    Index are moved to the Working Directory.
    git reset 91471e4 --mixed

    ##The ref pointers are updated and the reset stops there. The
    Staging Index and the Working Directory are left untouched.
    git reset 91471e4 --soft
i would say for as far as git commands are concerned we have now covered almost all the major commands that we use in our daily life.
Now lets continue with github and start cloning the repository to local computor, In order to do so, soon after you have created the repositorty you just need follow github instruction that they provide in next page. i.e
- First step is to clone the repository. This you can easily do it by copying clone url that is been created for you and executing following command in your console
git clone "<cloned_url>". Now the source code will be downloaded to your local. - After this in order make any changes in your cloned repo , just do edit your readme.md file and then run the command
git status. By now you should be able to see your changes listed on the console. This means git is able track your changes that you have made to this repository which is cool right. - Review your changes thoroughly and now changes are made only to your local repository but not on the code sitting on the remote server.
-
Now once you are sure about your changes all you need to is to push your code to the remote repository. In order to do so
- staging : This one extra step before we commit our file to the repo. This gives the freedom to git manage our changes whenever its needed. For adding the files to the you need run
git add <file-name>orgit add */.if you want push all your files. - Commit : Now you need to commit your staged files. This can be done using the command
git commit -m "<any commmit message>". - Push : This is step where the code is going to sit on the remote repository. command for this
git push.
- staging : This one extra step before we commit our file to the repo. This gives the freedom to git manage our changes whenever its needed. For adding the files to the you need run
Thats it. congratulations your first commit 🎉🎉
I hope you found this article useful. If it did please help others spreading the word.😊 For any suggestions or feeedbacks 👉 Contact